Pages
Friday, October 12, 2012
Wednesday, September 12, 2012
$2 Bow Sale!
Time to stock up! All small tots size bows are on Sale! Visit the Facebook page or Sandrabees.com for details and to order! Sale runs 1 week only! They won't be this low again until the Spring of 2013! Single layers are just $2 each. Choose from hundreds of colors..., including solid grosgrain, polka dots, stripes, preppy stripes, & printed ribbons.
Make them double layers for $1 more or add a monogram for $2.
Want an outfit matched? No problem. I can match colors for you with a picture or link to the outfit online
Please pin, share with mommy groups, Facebook and twitter friends and family!

Wednesday, September 5, 2012
Queen Platform Storage Bed DIY
Headboard/Footboard
1 – Sheet 3/4" Plywood, MDF
2 – 1x3 @ 8 feet long
2 – 2x3 @ 8 feet long
1 – 1x2 @ 8 feet long
4 – small moulding pieces 8 feet long
3/4” finish nails
1 1/4” pocket hole screws
Storage Bases
2 – Sheets ¾” plywood or MDF cut into strips 15 3/4" wide, referred to as 1x16 boards throughout this plan
2 – sheets ¼” plywood or other backerboard
4 – 2x4 @ 8 feet long
2 – 2x2 @ 8 feet long
3– 1x3 @ 8 feet long (for the slats – try and burn up small scraps here)
7 – 1x6 @ 8 feet long OR 1 sheet ¾” plywood cut into strips 5 1/2" wide, used as 1x6s for drawers. You could even use 5/8” thick material
4 – 1x8 @ 6 feet long
Optional drawer moulding
24 (or 12) – Drawer Knobs or handles
12 – 14” long drawer slides, the white euro style bottom corner mount ones will work best
1 1/4” and 2 1/2" pocket hole screws
1 1/4” finish nails
CUT LIST
Headboard/Footboard
1– 3/4" plywood or MDF @ 60” x 25" (headboard)
1 - 3/4" plywood or MDF @ 60 x 23" (footboard)
2 – 1x3 @ 60”
2 – 1x2 @ 60"
2 – 2x3 @ 47 1/2”
2 – 2x3 @ 27 1/2"
2 – 1x3 @ 67”
8– Moulding pieces ... i will have to measure these
8 - Moulding pieces (again i need to measure these (long point to long point, both ends cut at 45 degrees off square, not parallel to each other)
Storage Bases
4 – 1x16 @ 80”
8 – 1x16 @ 14 7/8”
2 – ¼” plywood @ 80” x 16 ¼”
4 – 2x4 @ 75"
4 – 2x4 @ 10”
2 – 2x2 @ 80"
14 – 1x3 or 1x2 scraps @ 7”
DRAWERS ( I need to double check the drawers
24 – 1x6 @ 14”
24 – 1x6 @ 21 ½” (I think I added a smidge to the length of the drawers Bu need to measure... I think I used 23 3/8")
12 – 1x8 @ 24 5/8” (Drawer Faces) measure and build to your exact drawers though
12 - ¼” plywood @ 23” x 14” (Drawer Bottoms). Again I think I added an inch or so... will need to measure to confirm)
This was the BIG summer project! The plan when moving my son to his own room (which happened to be the bonus room) was to eliminate the need for a dresser. Partly due to space and low ceilings. After much planning we decided on the Fillman storage Bed that Ana-White had posted. It was for a twin size bed. I calculated and measured and came up with a queen size based on those plans. I will update with my cut list and sizes if anyone is interested. For now here are the pictures! I did add 2 wooden knobs to each drawer (stained to match) Need to get an updated picture!
 | ||
| Headboard and Footboard trimmed out |

Easy Waffle Recipe
First off, I LOVE my waffle maker! It is made by GE and makes 4 square waffles at once. With a family of 5 this was a must for me. This recipe makes 12 and feeds us plus a few leftover. I always flash freeze the leftover ones and then place in a freezer bag. Then they can get popped in the toaster for a quick breakfast, snack or breakfast sand which base :-)
This recipe came with my waffle maker and is awesome just as is. Now sometimes I like to add blueberries, or diced apples and cinnamon or a dash of vanilla. But 95% of the time I use this basic recipe.
2 Cups flour
2 TBS sugar
1 TBS Baking powder
1 tsp salt
1 3/4 Cups milk
1/3 cup vegetable oil
2 eggs
First mix dry ingredients in a large bowl, then add milk, oil, and eggs and whisk until just blended. For my waffle maker I use 1/3 cup measuring cup to pour into each waffle square and it is perfect.
These are WAY better than any frozen store bought waffles, without any preservatives and so easy to whip up a batch.
If you want to stock your freezer you can make a few batches at once. To flash freeze lay them flat on a cookie sheet lined with wax paper. Stick in the freezer until hardened. (about an hour or 2) then transfer to a gallon size freezer bag. I think I can fit 8 in each... maybe a few more. I do also reuse my freezer bags if no meat was in them

Tuesday, September 4, 2012
This Week's Menu
Breakfast: Cereal
Breakfast: Cereal or grits
Breakfast: Homemade Waffles, sausage
Breakfast: Bagels
Dinner: Chicken Panini's, Broccoli Cheese Soup
***Lunches are usually easy pasta dishes, mac n cheese, sandwiches, or leftovers.

Free Sharpies's TODAY only

Snatch an 8-pack of Sharpie Fine Point Multi-Color Markers from Walmart for free with today’s Wild Deal at ShopAtHome.com. Plus, choose to pick your purchase up in the store to avoid shipping charges. We are always reaching for Sharpies in my house.... just be sure to keep them away from the kiddos hands LOL
Here is how Wild Deals work at ShopAtHome.com:
- Head to ShopAtHome.com.
- Click the "today's daily Deal" for Walmart
- Click “Buy It Now” button for the Sharpie's.
- Pay $3.97 for the 8 pack of Sharpie Fine Point Multi-Color Markers.
- Choose to pick your order up in the store and you won’t be charged shipping.
- $3.97 cash back will be added to your ShopAtHome.com account.
- Final Price: Free
Sunday, August 26, 2012
Breakfast: English muffins, eggs bacon cheese
Breakfast: Pancakes
Breakfast: Grits, cheese fruit
Breakfast: Cereal
Breakfast: Sausauge Biscuits
Dinner: Hamburger steak, rice/gravy, Mustard greens, Salad, homemade bread
Wednesday, August 22, 2012
JUMBO Size Bows on Sale!
Halloween Hair Clippies
 |
| Spider Clippies $4.50 each or 2 for $8 |
 |
| Ghost Clippies $3.50 each or 2 for $6 |
 |
| Bat Clippies $3.50 each or 2 for $6 |
 |
| Pumpkin Clippies $3.50 each or 2 for $6 |
|
Honey Chicken Crockpot Recipe
1/3 cup Honey
1/2 cup ketchup
1/2 cup Soy sauce
2 TBS minced garlic (or 2 cloves), garlic powder works in a pinch too!
Put all ingredients in the crock pot on low 6 hours. You can use any type of chicken with or without bones. We prefer boneless skinless breasts. Great served over rice or egg noodles. This makes a great sauce. I like to thicken the sauce before serving. Mix 2 TBS cornstarch or flour with 1 TBS cold water... then whisk into sauce on low heat... add more or less to desired sauce consistency. My kids LOVE this!
Sunday, August 19, 2012
Menu Plan Monday
Here is our weeks worth of meals. Lunch is usually leftovers (if there are any), pasta, wraps, or sandwiches. I usually try to bake a sweet of some sort towards the beginning of the week to include in the kids lunch boxes and for snack time. And forgive me for the reverse order of breakfast and dinner... this is copied from my app that I do my meal planning in and I am too lazy to reverse it! Promise we do eat breakfast first though! Lol
Dinner: Spaghetti, homemade bread
Dinner: Tacos
Dinner: Sticky chicken crock pot, rice, green beans
Dinner: steak, butter noodles, peas, yeast rolls
Dinner: Pizza party (homemade pizzas)
Dinner: Shrimp scampi
Dinner: Hamburgers, potato or pasta salad, baked beans

Sunday, July 8, 2012
Monogram Bow Special
Over 100 solid colors of ribbon to choose from! any questions?? Please shoot me an email


Tuesday, June 19, 2012
Laundry Room Dresser/Shelf
Here is a BEFORE of my rickety rackety sorter and hanging space:
And an after!!!
As you can see clothes are filled in the baskets an they are very sturdy! Each person in my family has their own basket now. the 6th basket is for fabric napkins and towels. They can hold dirty clothes... or clean, and slide in and out just like a dresser drawer.
I ammended the Ana White Laundry Dresser plan I built 2 dressers, however for the top piece I cut one piece (instead of 2) to help keep them together, then I squared them up when I put the backing on. I was going to do a ceramic tile countertop and build in the whole thing like cabinets... but then I started thinking about if we ever needed to replace the washing machine or dryer and needed to move those out of the room.... I had to keep the laundry dresser moveable too... so it is NOT attached to the wall and I left the baseboards in place :)
Eventually I will build a sink cabinet... and replace the utility sink... I will secure that piece of cabinet in place and the dresser will butt up to it. I had to keep this under a certain height so that my ironing board cabinet would still open and be usable :)
So all that said I joined varied lenghs of 1x3's which I sanded an distressed. The stain is ebony and red mahogany mixed with 2 coats of poly on top for a smooth finish.
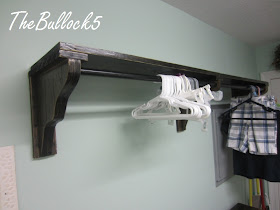
I also added wooden brackets with a rod for my hanging area. I came out enough to allow for hanger to hang and had to add a block of wood to the tops because I didn't account for the shelf being in the way when hanging... It works... same distressed look :)
How about some more pictures???
 |
| Close up of bracket |
 | |
| Close up of folding area. I LOVE, LOVE, LOVE my finish!!! |
I have decided to wait until my kiddos go back to school to finish the doors. This summer I am commited to getting my oldest son moved into the bonus room (which was the playroom) and have a BED to be built!! All 3 kiddos will be in school this year and I will have plenty of time to myself for projects!


